Thursday, July 11, 2013

Sweet Cheeks


***Tutorial Sweet Cheeks By JackieBeth, written on April 5, 2011***
**SAVE PROGRESS OFTEN**
***add drop shadows and resize/recolor when you see fit***

Items Needed
Paint Shop Pro/version PSPX was used to create this tutorial
tube/image of choice
Artist I Used: Zlata_M
you MUST purchase a license at her store HERE to use her work
(above image purchased when she was with PFD)
filter Alien Skin Xenofex II/Constellation
filter Mura Meister/Copies
filter Funhouse/Serrate
filter Funhouse/Gyro
filter AAA Frame/Foto Frame
font of choice/font I used in this tutorial "Kid Captain PB"
***********************************

open blank transparent canvas size 550 by 250

copy and paste tube of choice to canvas
apply filter Xero/Porcelain: change blue to 0
place tube to left side of canvas

add a new raster layer
move layer below tube
flood fill with color complimenting your tube
apply filter Xero/Fritillary:
granularity 8
aggression 30
tesselation 10
variation 0

crop entire canvas to size
duplicate your tube
select bottom layer
apply filter Mura Meister/Copies: wall paper

adjust/blur/radial blur:
blur type: zoom
blur
strength 52
all other values 2

apply filter Funhouse/Gyro:
spin 112
all other values 0

apply filter Funhouse/Serrate:
acuity 255
teeth 10
all other values 0

change blend mode to soft light

select the tube layer
apply filter AAA Frames/Foto Frame: width 1, matte 1, opacity 100
select the twirl layer, apply same settings
same with the background

go ahead and write your all your copyright information

select your background layer
duplicate four times
select the bottom layer
apply filter Alien Skin Xenofex II/Constellation:
star size 2
size variation 50
edge star density 30
overall star density 0
overdrive (depends on the color you use as your background) 100
twinkle amount 0
keep original image selected

select the next background layer and apply same settings
only pressing random seed
do all same for all four layers

animate as usual
add names and phrases as you wish

Eggs A Hoppin'


***Tutorial Eggs A Hoppin By JackieBeth, written on March 24, 2011***
**SAVE PROGRESS OFTEN**
***add drop shadows and resize/recolor when you see fit***

Items Needed
Paint Shop Pro/version PSPX was used to create this tutorial
tube/image of choice
Artist I Used: Elias Chatzoudis     
you MUST purchase a license at CDO HERE to use his work
filter Mura Meister/Copies
filter Xero/Porcelain
filter DSB Flux/Bright Noise
filter AAA Frames/Foto Frame
font of choice/font used in this tutorial: "MaritaTextBookHM"
***********************************

open a blank transparent canvas size 550 by 250

copy and paste tube of choice to canvas
apply filter Xero/Porcelain: change blue to 0
place tube to right side of canvas

open your foreground material properties
click edit and create a new gradient using 5 colors from your tube with your dropper tool
angle 0, repeats 0

 open a new canvas size 230 by 250
floodfill with gradient you just created
effects/distortion effects/polar coordinates:
polar to rectangle

copy and paste gradient to working canvas

effects/distortion effects/pixelate: 7, symmetric checked
effects/edge effects/enhance
repeat

recolor 0,0
duplicate twice for a total of three layers
recolor each rectangle a different color using your manual color correction
(if you dont have it select customize it and find it under unused commands)

now drag one color rectangle to the left and one to the right
make sure the middle shape is on top
select the top shape
image/flip
merge the two bottom shapes together
apply filter Mura Meister/Copies: line, change top "number" to 2

apply filter DSB Flux/Bright Noise: 15, mix

apply filter AAA Frames/Foto Frame: width 1, matte 1, opacity 100

apply all proper credits
add names/phrases as you wish

Mrs. Cottontail


***Tutorial Mrs. Cottontail By JackieBeth, written on March 19, 2011***
**SAVE PROGRESS OFTEN**
***add drop shadows and resize/recolor when you see fit***

Items Needed
Paint Shop Pro/version PSPX was used to create this tutorial
tube/image of choice
Artist I Used: Keith Garvey
you MUST purchase a license at CDO HERE to use his work
filter Mura Meister/Copies
filter DSB Flux/Bright Noise
filter Filter Factory Q/Mosaic
filter Xero/Porcelain
filter AAA Frames/Foto Frames
font of choice/font used in this tutorial: "Segoe Script"
***********************************

open a blank transparent canvas size 550 by 250

copy and paste tube of choice to canvas
apply filter Xero/Porcelain: change blue to 0

place to left side of canvas
duplicate tube
select bottom tube layer
apply filter Mura Meister/Copies: glob
apply filter Mura Meister/Copies: line
change only the top "number" to 4 instead of 8
crop entire canvas to size

apply filter Filter Factory Q/Mosaic:
nose 18
amount 18
duplicate layer
select top layer
apply same filter, changing both settings to 9

change top layer blend mode to soft light
hide tube layer
merge visible
effects/edge effects/enhance
apply filter DSB Flux/Bright Noise: 15, mix
unhide tube layer

duplicate background layer
adjust/blur/gaussian blur: 20
lower opacity to the blur layer to 77
(if you wish you can draw out a thin rectangle horizontally at the top, mirror then flip. merge the two shapes together and change blend mode to soft light.)

merge visible
apply filter AAA Frames/Foto Frame: width 1, matte 1, opacity 100

apply all proper credits
add names as you wish

Amazing


***Tutorial Amazing By JackieBeth, written on March 11, 2011***
**SAVE PROGRESS OFTEN**
***add drop shadows and resize/recolor when you see fit***

Items Needed
Paint Shop Pro/version PSPX was used to create this tutorial
tube/image of choice
Artist I Used: Keith Garvey
you MUST purchase a license at CDO HERE to use his work
filter Mura Meister/Copies
filter Filter Factory C/Interference
filter Xero/Porcelain
filter AAA Frames/Foto Frames
font of choice/font used in this tutorial: "Prime Minister of Canada"
***********************************

open a blank transparent canvas size 550 by 250
floodfill background with gradient metal steel, linear, angle 0, repeats 0

copy and paste tube of choice to canvas
apply filter Xero/Porcelain: change blue to 0

place tube to right side of canvas
crop entire canvas to size

duplicate your tube
apply filter Mura Meister/Copies: wall paper

adjust/blur/motion blur: angle 315, strength 100
repeat twice
move layer to bottom of palette
select the metal steel gradient
change blend mode to soft light

add a new raster layer (no need to fill with a color)
apply filter Filter Factory C/Interference:
Phase 1 245
X1 188
Y1 77
Phase 2 194
X2 68
Y1 184
Contrast 83
Mode 42

apply blend mode soft light to that layer as well
hide tube layer
merge visible
unhide tube layer

select your background
apply filter Alien Skin Xenofex 2/Constellation:
star size 3.98
size variation 50
edge star density 6
overall star density 4
overdrive 88
twinkle amount 75
twinkle rotation 45
keep original image selected

merge canvas visible

apply filter AAA Frames/Foto Frame: width 1, matte 1, opacity 100

----adding your saying-----

for my saying i have it going vertically, to get this effect do the following

write out your phrase
convert to raster layer
move to top of canvas
apply filter Mura Meister/Copies: Line
number 3
shift x 0
shift y 100
(following with changing the phrase blend to soft light)

everything else stays at default value

apply all proper credits
add names as you wish

Fame Monster


***Tutorial Fame Monster By JackieBeth, written on February 26, 2011***
**SAVE PROGRESS OFTEN**
***add drop shadows and resize/recolor when you see fit***

Items Needed
Paint Shop Pro/version PSPX was used to create this tutorial
tube/image of choice
Artist I Used: Robert Alvarado
you MUST purchase a license at CDO HERE to use his work
filter DSB Flux/Bright Noise
filter Xero/Porcelain
filter Funhouse/BugEye
filter VM Distortion/Tumbler
font of choice/font I used in this tutorial "Over the Rainbow & pixelmix"
***********************************

open a blank transparent canvas size 550 by 250

copy and paste tube of choice to canvas
apply filter Xero/Porcelain: change blue to 0

place tube to left side of canvas

with your dropper tool select two colors from your tube, one foreground and one background
change your gradient to linear: angle 40, repeats 1

add a new raster layer
move your new layer below your tube layer
floodfill with your gradient

apply filter Funhouse/BugEye: lenses 201

effects/edge effects/enhance

change background color to white
select preset shape and set to rectangle
draw a medium thickness horizontally across your entire canvas

apply filter DSB Flux/Bright Noise: mix, 98

change blend mode to soft light

copy and paste a close up image of choice (same artist)

apply filter VM Distortion/Tumbler:
Generator 1 128
Generator 2 128
Generator 3 128
Direction 100

using your freehand selection tool select the area to the left of your tube
press delete on your keyboard (deleting the tube tumbler layer)

apply blend mode soft light
recolor 0, 0

write out phrase of choice
merge visible

select preset shape set to rounded rectangle
spread out your shape the size of your canvas
center in canvas
convert to raster layer
apply filter DSB Flux/Bright Noise: mix, 98

crop canvas to size
select your back rounded rectangle layer
selections/select all/float/defloat/modify/contract/4
selections/invert
select your set
press delete on your keyboard
selections/select none

apply all proper credits
add names/phrases as you wish

(make sure your PNG optimization settings are correct if you plan to save as a .PNG file, if you are unsure of the optimization settings, remember, google is your friend)

Wednesday, July 3, 2013

Lucky Lass


***Tutorial Lucky Lass By JackieBeth, written on February 22, 2011***
**SAVE PROGRESS OFTEN**
***add drop shadows and resize/recolor when you see fit***

Items Needed
Paint Shop Pro/version PSPX was used to create this tutorial
tube/image of choice
Artist I Used: Ismael Rac
work currently unavailable for purchase
Kit Used: Feeling Lucky - FTU - Artmamas Studio - kit no longer available
mask of choice
*******************************************

open a blank transparent canvas size 500 by 500

copy and paste a paper of choice to your canvas
apply mask of choice
merge group

copy and paste emellie 16 (frame) to canvas

copy and paste paper 1 to canvas
move below frame layer
crop entire canvas to size

select frame layer
select magic wand tool
click in center of frame
selections/modify/expand/5 pixels
selections/invert
select paper layer
press delete on keyboard
selections/select none

copy and paste tube of choice to canvas
place to preference

copy and paste a bow to right side of canvas
copy and paste a ribbon going down below the bow

using the alpha make a phrase or name you wish to use on your tag
apply all proper credits

Hazy

***Tutorial Hazy By JackieBeth, written on February 18, 2011***
**SAVE PROGRESS OFTEN**
***add drop shadows and resize/recolor when you see fit***

Items Needed
Paint Shop Pro/version PSPX was used to create this tutorial
tube/image of choice
Artist I Used: Anthony Guerra
work currently unavailable
Kit Used: Friendship Collection Tania - FTU - Bel Vidotti Scraps -  Download HERE
font & mask of choice/font I used in this tutorial "Ability"
***********************************

open a blank transparent canvas size 500 by 500

copy and paste paper 12 to canvas
crop canvas to size
apply mask of choice
merge group

copy and paste lace frame to canvas
copy and paste paper 2 to canvas
move below frame layer
copy and paste two copies of your tube
move below frame layer
have the tubes mirror each other and place to each side of frame
merge the two tubes together

select frame layer
with magic wand tool click in center of frame
selections/modify/expand/5 pixels
invert
select the paper
press delete on keyboard
select the tubes inside the frame
press delete on keyboard
selections/select none

select the two tubes
set blend mode to soft light

copy and paste sparkles 1 to canvas

hide your mask layer
merge visible
unhide your mask layer

copy and paste bow 6 to canvas
place to upper left of canvas

copy and paste butterfly 2 to canvas
place middle right side of frame

copy and paste ribbon 3 to canvas
image/flip
move toward right bottom of canvas

copy and paste tube of choice to canvas

place to preference
now if you wish copy and paste flowers 1 and place around your tube

apply all proper credits
add names/phrases as you wish

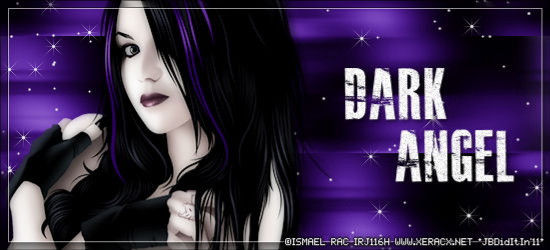
Dark Angel


***Tutorial Dark Angel by JackieBeth, written on February 13, 2011***
**SAVE PROGRESS OFTEN**
***add drop shadows and resize/recolor when you see fit***

Items Needed
Paint Shop Pro/version PSPX was used to create this tutorial
tube/image of choice
Artist I Used: Ismael Rac
work currently unavailable for purchase
filter Alien Skin Xenofex II/Constellation
filter Mura Meister/Copies
filter AAA Frames/Foto Frame
font of choice/font used in this tutorial: "Masterplan"
***********************************

open a blank transparent canvas size 550 by 250

copy and paste tube of choice to canvas
place to preference
apply filter Xero/Porcelain: change blue to 0
place tube to left side of canvas
crop entire canvas to size

duplicate your tube
select the bottom tube layer
adjust/blur/motion blur: angle 90, strength 100
duplicate two more times

apply filter Mura Meister/Copies: wall paper (change "number" to 5)
hide your tube
duplicate your background three or four times
make sure there is no transparency
merge background visible
unhide your tube

recolor background to 0, 0
select your manual color correction tool
(will be in customization unused tools if you haven't used it before)
change background to color that compliments your tube

apply filter Alien Skin Xenofex II/Constellation:
star size 3.98
size variation 50
edge star density 1
overall star density 1
overdrive 100
twinkle amount 75
twinkle rotation 75
keep original image selected
random seed 8115

merge canvas visible

apply filter AAA Frames/Foto Frame: width 7, matte 1, opacity 50

apply all proper credits
add names/phrases as you wish

Gemstone Beauty


***Tutorial Gemstone Beauty By JackieBeth, written on February 9, 2011***
**SAVE PROGRESS OFTEN**
***add drop shadows and resize/recolor when you see fit***

Items Needed
Paint Shop Pro/version PSPX was used to create this tutorial
tube/image of choice
Artist I Used: Ismael Rac
work currently unavailable for purchasefilter Xero/Radiance
filter Mura Meister/Copies
filter VM Distortion/Radiator
filter Eye Candy 5/Impact/Glass
filter DSB Flux/Bright Noise
filter AAA Frame/Foto Frame
font of choice/font used in this tutorial: "Amplia"
*******************************************

open a blank transparent canvas size 550 by 250

copy and paste tube of choice to canvas
apply filter Xero/Radiance:
strangeness 235
charm 73
truth 114
beauty 220

place tube to left side of canvas
duplicate tube
select bottom tube layer

effects/reflection/kaleidoscope
horizontal offset 37
vertical offset -72
rotation angle 202
scale factor -50
number of petals 18
number of orbits 3
radial suction 21
color, choose a dark color of choice

add a new raster layer
move to bottom of layer palette
flood fill layer with solid color
apply filter DSB Flux/Bright Noise: 25, mix

duplicate top tube
select middle tube layer
apply filter Mura Meister/Copies: Wall Paper

apply filter VM Distortion/Radiator:
generator 1 220
generator 2 168
generator 3 98
frequency 120
heat 78
fine tuning 159

select the kaleidoscope layer
selections/select all/float/defloat
selections/invert
select radiator layer
press delete on keyboard

crop canvas to size

delete original kaleidoscope layer
select the radiator layer
apply filter Eye Candy 5 Impact/Glass
choose "preset clear, no drop shadow"

merge canvas visible

apply filter AAA Frames Foto Frame: width 7, matte 1, opacity 10

apply all proper credits
add names/phrases as you wish

Totally Twisted


***Tutorial Totally Twisted By JackieBeth, written on February 3, 2011***
**SAVE PROGRESS OFTEN**
***add drop shadows and resize/recolor when you see fit***

Items Needed
Paint Shop Pro/version PSPX was used to create this tutorial
tube/image of choice
Artist I Used: Ismael Rac
work currently unavailable for purchase
filter Xero/Porcelain
filter Mura Meister/Pole Transform
filter Mura Meister/Copies
filter AAA Frame/Foto Frame
font of choice/font used in this tutorial: "HaloHandletter"
*******************************************

open a blank transparent canvas size 550 by 250

copy and paste tube of choice
apply filter Xero/Porcelain: change blue to 0
place tube to preference

duplicate your tube
adjust/blur/motion blur: angle 45, strength 100
crop entire canvas to size

apply filter Mura Meisters/Pole Transform: default settings (hit reset if needed)
apply filter Mura Meisters/Copies: preset line (change "number" to 4)

effects/edge effects/enhance

add new raster layer
move new layer below tube and background
floodfill with solid color of choice
change blend mode to soft light

hide your main tube
merge visible
duplicate background
image/mirror
image/flip
change opacity to 50
merge visible
unhide your tube layer

merge entire canvas visible

apply filter AAA Frames/Foto Frame: width 7, matte 1, opacity 100

apply all proper credits
add names/phrases as you wish

Monday, July 1, 2013

I'm Blue


***Tutorial Im Blue By JackieBeth, written on January 26, 2011***
**SAVE PROGRESS OFTEN**
***add drop shadows and resize/recolor when you see fit***

Items Needed
Paint Shop Pro/version PSPX was used to create this tutorial
tube/image of choice
Artist I Used: Anthony Guerra
work currently unavailable
filter Alien Skin Xenofex 2.0/Constellation
filter DSB Flux/Bright Noise
filter Xero/Porcelain
filter Mura Meister/Copies
font & mask of choice/font I used in this tutorial "KolkerBrush"
***********************************

open a blank transparent canvas size 500 by 500

select your rectangle preset shape
foreground & background color white
line width set at 0

draw out a medium size square
(pressing shift down while drawing the shape)
center in canvas
convert to raster layer

apply filter DSB Flux/Bright Noise: mix, 40

copy and paste your image of choice

select your square shape
selections/select all/float/defloat
selections/modify/contract/5 pixels
place your image inside the selection that you want shown
selections/invert
press delete on your keyboard
selections/select none
crop entire canvas to size

apply filter Xero/Porcelain: change blue to 0
duplicate your image
move the bottom image to the bottom of your layer palette

adjust/blur/gaussian blur: 15
apply filter Mura Meister/Copies: wall paper

apply mask of choice
merge group

duplicate your main image
merge together the white square and the duplicate image
free rotate left 9

drag the original image above the mask layer

apply filter Mura Meister/Copies: Blur (linear)

apply filter Alien Skin Xenofex 2.0/Constellation:
star size 4.0
size variation 50
edge star density 1
overall star density 15
overdrive 100
twinkle amount 80
twinkle rotation 45
keep original image selected

duplicate your main image with the square
resize by 50 %
apply filter Mura Meister/Copies: cards
number: 8
shift x -7
shift y - 50
angle 0
rotation 264
phase -40
cycle -14
attenuation 0
scale 138
thru bg range 0
fade out 100

move the "card" layer to the upper left corner
move below main image

apply all proper credits
add names/phrases as you wish

Broken Crayons

****Broken Crayons by JackieBeth written on March 26, 2019**** **SAVE PROGRESS OFTEN** ***add drop shadows and resize/recolor when ...